CyberKeeda In Social Media
Showing posts with label Serverless. Show all posts

How to restrict AWS S3 Content to be accessed by CloudFront distribution only.


CloudFront is one of the popular services of AWS that gives Caching mechanism for our static contents like html, css, images and media files serving a very fast performance using it's globally available CDN networks of POP sites.

In this blog post, we will know 

  • How to create a basic CloudFront distribution using S3 as Origin.
  • How can we create a CloudFront distribution using S3 as Origin without making the Content of Origin(s3 Objects) public.
  • What, Why and How about CloudFront OIA.


Here in this scenario, we will be using S3 bucket as an Origin for our CloudFront distribution


We will understand the problem first and then know, how Origin Access Identity can be used to address the request.

So we have quickly created a S3 bucket and CloudFront distribution using default settings with below details.

  • S3 bucket name - s3-web-bucket
  • Bucket Permissions - Block all Public Access
  • CloudFront distribution default object - index.html
  • CloudFront Origin - s3-web-bucket

Now, quickly upload a index.html file under the root of s3 bucket as s3-web-bucket/index.html.

We are done with the configuration, let's try to quickly access the CloudFront distribution and verify if everything is working perfectly or not.

$ curl -I https://d2wakmcndjowxj.cloudfront.net

HTTP/2 403
content-type: application/xml
date: Thu, 14 Jul 2022 07:28:37 GMT
server: AmazonS3
x-cache: Error from cloudfront
via: 1.1 ba846255b240e8319a67d7e11dc11506.cloudfront.net (CloudFront)
x-amz-cf-pop: MRS52-P4
x-amz-cf-id: BbAsVxxWfW9v3m1PD2uBHqRIj_7-J5U3fUzhhFiQQhbJj8a7lQlCvw==
We encountered 403 error, why ?
Ans : This is expected as we have kept the bucket permission level as Block All Public Access.

Okay, then let's modify the bucket permission and Allow Public Access, for this follow the below two steps.

  • Enable Public Access from Console by unchecking the Check box "Block all public access" and Save it.

  • Append the below Bucket Policy JSON statement to make all objects inside the Bucket as Public, the one highlighted in red can be replaced by your own Bucket name.

{
    "Version": "2012-10-17",
    "Statement": [
        {
            "Sid": "AddPerm",
            "Effect": "Allow",
            "Principal": "*",
            "Action": "s3:GetObject",
            "Resource": "arn:aws:s3:::s3-web-bucket/*"
        }
    ]
}

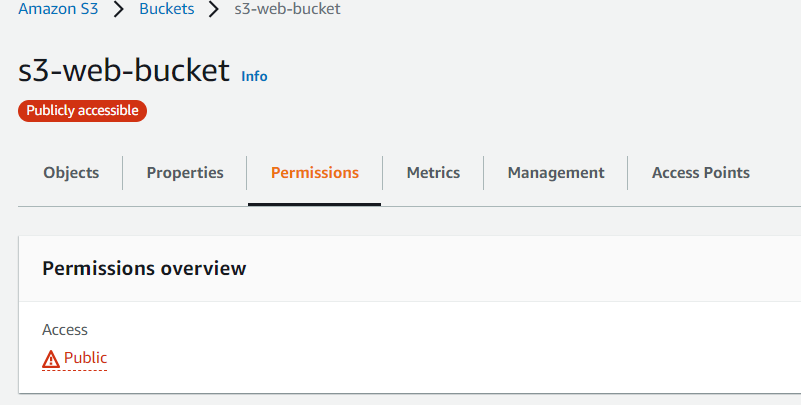
  • Save it, and your bucket permission section will appear with Red Amber signifying that your bucket is publicly accessible.

Done, Now let's try again to access the Website (index.html) from our CloudFront distribution.

$ curl -I https://d2wakmcndjowxj.cloudfront.net

HTTP/2 200
content-type: text/html
content-length: 557
date: Thu, 14 Jul 2022 07:47:58 GMT
last-modified: Wed, 13 Jul 2022 18:50:58 GMT
etag: "c255abee97060a02ae7b79db49ed7ec1"
accept-ranges: bytes
server: AmazonS3
x-cache: Miss from cloudfront
via: 1.1 ba055a10d278614dad75399031edff3c.cloudfront.net (CloudFront)
x-amz-cf-pop: MRS52-C2
x-amz-cf-id: Bhf_5IjA0sifp7jON4dpzZdjpCZCQTF5L7c5oenUbjc1vZzvL6ZUWA==

Good, we are able to access our webpage and now our static contents will be served from CDN network, but wait let's try to access the object(index.html) from bucket's S3 URLs too.

$ curl -I https://s3-web-bucket.s3.amazonaws.com/index.html

HTTP/1.1 200 OK
x-amz-id-2: OgLcIIYScHdVok2puZb09ccCjU5K9xNxOL6D1sVj/nBf6hm93vCjQQSpm3fxo4tXpdjUa3u2TS0=
x-amz-request-id: 588WXNR2BH9F37R9
Date: Thu, 14 Jul 2022 07:50:42 GMT
Last-Modified: Wed, 13 Jul 2022 18:50:58 GMT
ETag: "c255abee97060a02ae7b79db49ed7ec1"
Accept-Ranges: bytes
Content-Type: text/html
Server: AmazonS3
Content-Length: 557

Here is the loophole, naming standards for any s3 bucket urls and it's respective objects are quite easy to guess if one knows the name of the bucket only.

User, developer and hackers can bypass the CloudFront url and can get access to Objects directly from S3 Urls only, but you may think or what's the issue as they are anyhow public read in nature by permissions.

So to answer these questions, here are some points I would like to point, how accessing content via CloudFront URls is useful

  • CloudFront URLs give you better performance.
  • CloudFront URL can provide Authentication mechanism.
  • CloudFront URL gives additional possibilities to trigger CloudFront Function, which can be used for custom solutions.
  • Sometimes content of a website/API is designed to be served via CloudFront only, accessing it from S3 gives you a portion of it's content.
These are few counter points, but there are many more to support why should you disable public access to your s3 buckets.

Read more ...

CloudFront : How to host multiple buckets from single CloudFront domain


As far if you follow this blog's posts, here mostly posts are related to cloud tasks assigned to me as an requirement, you can think as one of the industry standard requirements too.

In this blog post, we will see how we can achieve the above scenario that is One CloudFront domain to host multiple S3 buckets as origin.

Let's follow the steps as follow.

Create 3 different S3 buckets as per above architecture diagram.


As per the architecture diagram, create respective directories to match the URI path that is

  • http://d233xxyxzzz.cloudfront.net/web1 --> s3-web1-bucket --> Create web1 directory inside s3-web1-bucket/
  • htttp://d233xxyxzzz.cloudfront.net/web2 --> s3-web2-bucket --> Create web2 directory inside s3-web2-bucket/

Dump 3 individual index.html files, that resembles to be an identifier as content served from that specific bucket.

  • index.html path for s3-web-bucket -- s3-web-bucket/index.html
  • index.html path for s3-web1-bucket -- s3-web-bucket/web1/index.html
  • index.html path for s3-web2-bucket -- s3-web-bucket/web2/index.html

This is how my three different index.html looks like.


We are set from the Bucket part, let's jump to CloudFront and create a basic CloudFront distribution with one of the s3 bucket as origin, here we have chosen s3-web-bucket as our origin for CloudFront distribution with other default settings.


Note : Default root object to index.html, else we have to append index.html manually every time after /

Now here comes the fun, we have our CloudFront URL in active state and thus according to our architecture this is what we are expecting overall.


Create Origins for S3 buckets.

Let's add other two more origin, which are the two other remaining s3 buckets.

Origin Configuration for S3 bucket "s3-web1-bucket"


Origin Configuration for S3 bucket "s3-web2-bucket"


Create Behaviors for the above origins.

So far, we have added all the s3 buckets as origin, now let's create the behavior which is path aka URI based routing.

Behavior 1 - /web1 routes to s3-web1-bucket

Behavior 2 - /web2 routes to s3-web2-bucket

Overall, within the Behavior tab, it should look as below  


That's it !
Let's Open Browser and test the urls one by one.

  • https://d2wakmcndjowxj.cloudfront.net
  • https://d2wakmcndjowxj.cloudfront.net/web1/index.html
  • https://d2wakmcndjowxj.cloudfront.net/web2/index.html
  
Hope this will help you in some sort !
Read more ...

Continuous Integration of Lambda Function using AWS SAM


AWS Lambda Function is awesome and trust me if you are working on AWS, sooner or later you have to deal with AWS Lambda.

In this blog post, we will cover the below use cases.

  • What is AWS SAM
  • How to create Lambda Function using AWS SAM
  • How to delete Lambda Function created using AWS SAM
  • How to integrate AWS SAM with Docker.
  • How to create a continuous integration pipeline with Jenkins, GitHub, Docker and SAM.


What is AWS SAM.

One can find a huge detailed information in official documentation, here is the AWS link for the same.

I would like to share my level of short understanding with you, that can give you some idea of AWS SAM and it's respective components.

  • AWS SAM that is focused on the creating Application using AWS PAAS services such as API Gateway, AWS Lambda, SNS, SES etc.
  • SAM templates are somehow similar to CloudFormation templates, so one who has idea of CloudFormation can easily adapt SAM templates too.
  • SAM shorten the code when it's being compared to CloudFormation for Serverless services deployment.
  • SAM in backend create CloudFormation stacks to deploy the AWS services, that means it's avoid some part of code that has to be written by user and does the job for you by adding those lines.
  • In order to use SAM, one needs an download additional binary/package which is not being clubbed with AWS CLI.
How to create Lambda Function using SAM ?

Before you directly jump into it, first know the must know stuffs from file and directory prospective.

  • samconfig.toml : Configuration file that will be used during the SAM commands ( init, test, build, validate etc)
  • template.yml : SAM template, similar to CloudFormation template to define Parameter, Resource, Metadata, Output, Mapping etc.
  • events - Directory to store events for testing our Lambda code using events.json file.
  • tests - Directory that contains the unit test files
Lab setup details -
    - We will be deploying a Lambda Function with Python 3.7 runtime.
    - Name of our sam application is sam-deployer_with_sam
    - This is how our Lambda Function looks like in console and it's basic task is to check the status of           port, ie Open or Closed 
    - Our files and templates follow the CICD approach, so we have kept our code for two environment
        that is ( default, dev, uat )


Steps.
  • Install AWS SAM CLI first.
  • All tutorial you might have went through will ask you to go through the sam init, sam build and all, this blog is post is little baked one by using existing templates.
  • Create a new directory to use in this project
$ mkdir lambda-deployer_with_sam
  • Create a new files following the below directory structure layout
lambda-deployer_with_sam/
├── events
│   └── event.json
├── samconfig.toml
├── src
└── template.yaml

2 directories, 3 files

Here is the basic content to post in respective files.

Contents of samconfig.toml
version = 0.1
[default]
[default.deploy]
[default.deploy.parameters]
stack_name = "default-lambda-deployer-with-sam-Stack"
s3_bucket = "lambda-deployer-sam-bucket"
s3_prefix = "sam-lambda-stack"
region = "ap-south-1"
capabilities = "CAPABILITY_IAM"
disable_rollback = true
image_repositories = []

[dev]
[dev.deploy]
[dev.deploy.parameters]
stack_name = "dev-lambda-deployer-with-sam-Stack"
s3_bucket = "lambda-deployer-sam-bucket"
s3_prefix = "dev-sam-lambda-stack"
region = "ap-south-1"
capabilities = "CAPABILITY_IAM"
disable_rollback = true
image_repositories = []
parameter_overrides = "Environment=\"dev\""

[uat]
[uat.deploy]
[uat.deploy.parameters]
stack_name = "uat-lambda-deployer-with-sam-Stack"
s3_bucket = "lambda-deployer-sam-bucket"
s3_prefix = "uat-sam-lambda-stack"
region = "ap-south-1"
capabilities = "CAPABILITY_IAM"
disable_rollback = true
image_repositories = []
parameter_overrides = "Environment=\"uat\""


Lets understand the content of sam configuration file, that is samconfig.toml.
  • This file will be used later during the deployment operation Lambda and it's respective resource.
  • This file can be used to categorize environment specific paramters.
  • The first line [ default ],  [ dev ] , [uat]defines the name of the environment
  • All the next lines coming after Second and Third Line [uat.deploy.parameters] is provide environment specifc paramters.
  • parameter_overrides is the one, that is used to override the default parameter provided in the template.yml file, which is equivalent to cloudformation template.
Contents of template.yml
AWSTemplateFormatVersion: '2010-09-09'
Transform: 'AWS::Serverless-2016-10-31'
Description: An AWS Serverless Specification template describing your function.

Parameters:
  Environment:
    Description:    Please specify the target environment.
    Type:           String
    Default:        "dev"
    AllowedValues:
      - dev
      - uat
  AppName:
    Description:  Application name.
    Type:         String
    Default:      "find-port-status"

Mappings:
  EnvironmentMap:
    dev:
     IAMRole: 'arn:aws:iam::897248824142:role/service-role/vpclambda-role-27w9b8uq'
    uat:
      IAMRole: 'arn:aws:iam::897248824142:role/service-role/vpclambda-role-27w9b8uq'
    stg:
      IAMRole: 'arn:aws:iam::897248824142:role/service-role/vpclambda-role-27w9b8uq'

Resources:
  LambdabySam:
    Type: 'AWS::Serverless::Function'
    Properties:
      FunctionName: !Sub 'ck-${Environment}-${AppName}'
      Handler: lambda_function.lambda_handler
      Runtime: python3.7
      CodeUri: src/
      Description: 'Lambda Created by SAM template'
      MemorySize: 128
      Timeout: 3
      Role: !FindInMap [EnvironmentMap, !Ref Environment, IAMRole]
      VpcConfig:
        SecurityGroupIds:
          - sg-a0f856da
        SubnetIds:
          - subnet-e9c898a5
          - subnet-bdbb59d6
      Environment:
        Variables:
          Name: !Sub 'ck-${Environment}-${AppName}'
          Owner: CyberkeedaAdmin
      Tags:
        Name: !Sub 'ck-${Environment}-${AppName}'
        Owner: CyberkeedaAdmin


Now, our last step is put our Lambda code into src diectory.

$ touch src/lambda_function.py 

Contents of src/lambda_function.py
import json
import socket


def isOpen(ip,port):
   s = socket.socket(socket.AF_INET, socket.SOCK_STREAM)
   try:
      s.connect((ip, int(port)))
      s.settimeout(1)
      return True
   except:
      time.sleep(1)
      return False
      
def lambda_handler(event, context):
    
    if isOpen('142.250.195.196',443):
        code = 200
    else:
        code = 500


    return {
        'statusCode': code,
        'body': json.dumps("Port status")
    }

Now, we have everything in place, let's deploy or Lambda code using SAM.

Initiate SAM build with respective environment, defined in samconfig.toml
$ sam build --config-env dev

Output will look, something like below.
Building codeuri: /home/kunal/aws_sam_work/lambda-deployer_with_sam/src runtime: python3.7 metadata: {} architecture: x86_64 functions: ['LambdabySam']
requirements.txt file not found. Continuing the build without dependencies.
Running PythonPipBuilder:CopySource

Build Succeeded

Built Artifacts  : .aws-sam/build
Built Template   : .aws-sam/build/template.yaml

Commands you can use next
=========================
[*] Invoke Function: sam local invoke
[*] Test Function in the Cloud: sam sync --stack-name {stack-name} --watch
[*] Deploy: sam deploy --guided

Now, we have build ready to be deployed.. let's initiate sam deploy.
$ sam deploy --config-env dev
Output will look, something like below.
Uploading to dev-sam-lambda-stack/dccfd91235d686ff0c5dcab3c4d44652  400 / 400  (100.00%)

        Deploying with following values
        ===============================
        Stack name                   : dev-lambda-deployer-with-sam-Stack
        Region                       : ap-south-1
        Confirm changeset            : False
        Disable rollback             : True
        Deployment s3 bucket         : 9-bucket
        Capabilities                 : ["CAPABILITY_IAM"]
        Parameter overrides          : {"Environment": "dev"}
        Signing Profiles             : {}

Initiating deployment
=====================
Uploading to dev-sam-lambda-stack/b6c26b6d535bf3b43f5b0bb71a88daa1.template  1627 / 1627  (100.00%)

Waiting for changeset to be created..

CloudFormation stack changeset
---------------------------------------------------------------------------------------------------------------------
Operation                     LogicalResourceId             ResourceType                  Replacement                 
---------------------------------------------------------------------------------------------------------------------
+ Add                         LambdabySam                   AWS::Lambda::Function         N/A                         
---------------------------------------------------------------------------------------------------------------------

Changeset created successfully. arn:aws:cloudformation:ap-south-1:897248824142:changeSet/samcli-deploy1646210098/97de1b9e-ed08-45fe-8e65-fb0c0928e8f7


2022-03-02 14:05:09 - Waiting for stack create/update to complete

CloudFormation events from stack operations
---------------------------------------------------------------------------------------------------------------------
ResourceStatus                ResourceType                  LogicalResourceId             ResourceStatusReason        
---------------------------------------------------------------------------------------------------------------------
CREATE_IN_PROGRESS            AWS::Lambda::Function         LambdabySam                   -                           
CREATE_IN_PROGRESS            AWS::Lambda::Function         LambdabySam                   Resource creation Initiated 
Initiate SAM build with respective environment, defined in samconfig.toml
CREATE_COMPLETE               AWS::Lambda::Function         LambdabySam                   -                           
CREATE_COMPLETE               AWS::CloudFormation::Stack    dev-lambda-deployer-with-     -                           
                                                            sam-Stack                                                 
---------------------------------------------------------------------------------------------------------------------

Successfully created/updated stack - dev-lambda-deployer-with-sam-Stack in ap-south-1

This step, will create the required services and it's respective configuration, confirm the same from lambda console, this is how it looks like.


Please note, every time we make any changes in lambda_function.py file, we need to re-build and deploy.

That's in this post, we will know later in next post about below stuffs.
  • How to delete Lambda Function created using AWS SAM
  • How to integrate AWS SAM with Docker.
  • How to create a continuous integration pipeline with Jenkins, GitHub, Docker and SAM.


Read more ...
Designed By Jackuna